This article was originally written in early 2021 to document the steps I took to renounce Indonesian citizenship. However, in April 2022 AHU made a major revision to their requirements, so this article is updated to reflect the latest requirements as of April 2022.
In case you’re currently banging your head on the wall, I just want to tell you that you’re not alone, and you’ll get through this.
This post is solely focused on renouncing Indonesian Citizen and becoming a Singapore Citizen. Because that’s what I did. If you’re living in other countries, I’m sorry I don’t know whether the procedure is similar or not, because I heard that KBRI in other countries may/may not provide the same service as KBRI in Singapore.
Introduction
I still vividly remember how frantic I was when I got the Approval-in-Principle from ICA in February 2020. I literally knew no one in my social circle that has completed the renunciation through the new SAKE system.
Long story short, after calling and asking so many people and visiting so many different institutions, I finally found someone who taught me how to renounce Indonesian citizenship. To pay it forward, I decided to write this post, to help Indonesian who are converting to Singaporean, who are not familiar with Bahasa Indonesia.
Fast forward to 2022, AHU changed their requirement. They no longer accepted legalization by public notary in Indonesia. Instead, they now require legalization by Indonesia’s representatives (KBRI) or the issuing institution.
In this post, I’ll do my best to walk you through the renunciation process from the day you get your AIP, until you take the oath at ICA.
TABLE OF CONTENT
A. What to do when you get AIP
i) Complete Singapore Citizenship Journey
ii) Prepare documents
iii) Look for sworn translators
iv) Understand legalization requirement (New)
v) Legalize documents at dukcapil (New)
vi) Look for materai
B. What to do when you get the final approval letter from ICA
1. Translate the documents from English to Bahasa Indonesia
2. Legalize documents at KBRI (New)
3. Scan these documents in JPG/JPEG/PNG format in color
4. Register SAKE account
5. Choose the correct option
6. Fill up the form
7. Download Surat Permohonan
8. Upload the documents
9. Choose Payment Method
10. Make Payment
11. Send the hardcopy documents to AHU Office in Jakarta
12. Keep praying and checking the SAKE system
13. If there is error in your application
14. If you get all green, congratulations!
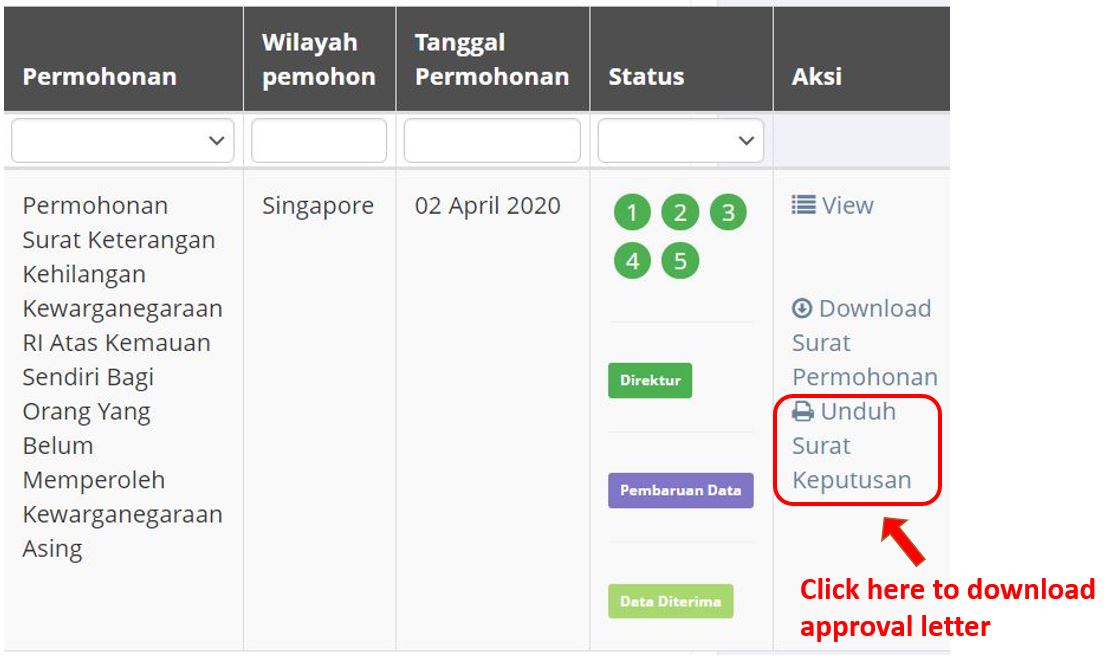
15. Download the approval document and translate it
16. Make appointment with KBRI to surrender your Indonesian passport
17. Make appointment with KBRI Consular to legalize the approved AHU Letter
18. Surrender your Indonesian passport
19. Legalize your AHU approval letter
20. Go to ICA for Oath taking and submission of necessary documents
FAQ
Please Note
A. What to do when you get AIP
If you’re reading this article, I’m 99% sure that you are either waiting for your Approval-in-Principle from ICA, or you’ve already received the AIP.
When you receive the AIP, you CAN’T renounce your citizenship YET. You’re supposed to complete the citizenship journey first, then ICA will send you a final approval letter, then you’ll be able to renounce your citizenship.
Here are the things you need to do when you got AIP.
i) Complete Singapore Citizenship Journey
I received my AIP hardcopy letter in February 2020 before the world came to a standstill.
I immediately logged in to SC Journey website to start my journey. I was that eager!
The first thing I did was to complete the e-journey. Basically there were several videos that you have to watch and questions you must answer. It took me less than half a day to complete.
The second thing we have to complete in SC Journey is attending a Singapore Experiential Tour. During my time, the tour was a physical tour held in various museum and historical landmarks. But I heard that they changed the tour to be a virtual tour after ‘rona turned the world upside down.
Lastly, we have to attend a Community Sharing Session. There were only one session a month so I was quite lucky to get a slot for the next month in March 2020.
The deadline to complete all 3 activities in the SC Journey is 2 months from the issue date of AIP. If you’re having difficulties to meet the deadline, you may contact SC Journey team for assistance.
ii) Prepare documents
While waiting for the tour or sharing session, you can try to prepare some documents so that when you receive the final approval letter, you’re ready to get into action.
Here are the documents that you need to prepare in this stage:
- Original Passport
- Original Birth Certificate
- Original KK (Kartu Keluarga) – optional, if you don’t have KTP
- Original KTP (Kartu Tanda Penduduk)
- Original ROM Certificate, if any
- Original Indonesian Marriage Certificate, if any
- 6pcs of Photo (size 4×6) with red background
Reader’s feedback:
- AHU accepts expired KTP and Passport. (This is not an advice, just a feedback. AHU may change their rules anytime. Proceed with own risk)
- If you don’t have KTP, but you have KK, it’s not a problem because AHU just need your NIK number actually. So, just write a statement that you don’t have a KTP, paste a materai and sign on it.
- If you only have a photo with white background, you can use Photoshop to change the background color to red.
iii) Look for sworn translators
At this stage, you don’t need to translate documents yet. You’ll need to translate certain documents later in this journey, so it’s better to start looking for a sworn translator that you are comfortable with.
For me, I use Anwar from Tan, Lee & Choo. He can be contacted through Whatsapp (+65 9650 5794) and email (of********@*******om.sg). He charged me SGD 30 per document. He is really fast, he could get it done in the same day (mainly because he has already setup a template that he can reuse), but could make mistakes sometimes, so you need to ask him to send you the draft before you proceed to collect the document from him.
A reader (Evelyn) used Pak Daniel Budiyono (+62 812-9983-125). He is able to provide softcopy of the translated documents. His fees are around IDR 125k per page (processing time 4 days) or IDR 200k per page (faster processing time, 1 day).
Anyway, you can use ANY sworn translators. But other translators may need more time because they may not be familiar with the content of the documents to be translated.
iv) Understand legalization requirement
SAKE team only accepts documents that are legalized by Indonesia’s representatives (KBRI) or the issuing institutions.
KBRI in Singapore can only legalize documents that they issued, eg: passports issued by KBRI
For documents issued by other institutions in Singapore (such as ICA letter and ROM Certificate), KRBI used to be able to legalize but they announce they stop legalizing these documents from July 2022 onwards. According to members in Telegram group, some members decided not to legalize these 2 documents and managed to pass SAKE successfully.
For other documents (like birth cert, KTP, KK, surat nikah, etc), you need to legalize them at dukcapil of the city that the documents are issued. If all of your documents are issued in one city, then you can just go to the dukcapil in that city. Otherwise, if your docs are issued in different cities, you need to make multiple trips to each dukcapil.
v) Legalize documents at dukcapil
At this stage, you can start legalization at dukcapil if you already have all the required documents as follow:
- Birth cert
- Passport (if issued in Indonesia, you need to legalize it in Indo; for passport issued in KBRI Singapore, you can choose either to legalize at KBRI SG or in Indo)
- KTP
- KK (optional, only required if you don’t have KTP)
- Marriage certificate issued in Indonesia (you can also legalize akta nikah at KUA)
Each dukcapil has different regulations, there’s no one size fits all. Some dukcapil requires in-person submission, others strictly allows online submission. Some dukcapil requires original documents, others accept photocopy. Most dukcapil provide legalization service free of charge.
Some dukcapil doesn’t want to legalize KTP and asks you to legalize at kelurahan. Some dukcapil can legalize e-ktp, others don’t want to because the current law states that e-ktp no longer requires legalization.
To look for information/contact of your local dukcapil, simple google dukcapil <your city>. Some dukcapil can also be contacted via whatsapp.
vi) Look for materai
You’ll need 1 materai to be used on the application form. But I suggest you prepare 2, just in case your application gets rejected and you need to resubmit.
Do note that from 2022 onwards, it’s compulsory to use the new materai that costs IDR 10,000.
For me, I asked my family to buy it in Indonesia and send it to me.
If you are in Singapore and you are wondering if you can buy materai in Singapore, the good news is you can buy it online from here or here.
B. What to do when you get the final approval letter from ICA
Within 1 or 2 weeks upon the completion of SC Journey, you can expect the final approval letter from ICA. Once you receive this golden letter, it’s time to go into full action.
ICA’s letter will state the date you’re supposed to report at ICA Citizenship Unit for oath taking. And, there’s 99% probability that you can’t meet the date set by ICA. So, you need to reschedule your oath taking appointment.
You can just email ICA to explain about your situation and ask for extension. Most of the time, they’re quite understanding and will extend your deadline for you. Don’t inform them too late! Otherwise you’ll be counted as having missed your appointment once.
1. Translate the documents from English to Bahasa Indonesia
Here are the documents that you need to translate from English to Bahasa Indonesia:
- ICA’s final approval letter. Not the Approval-in-Principle letter, but the final one that you receive after you complete SC Journey.
- ROM Certificate, if any. If you’re married in Singapore and you only have a ROM Cert, then just translate the ROM Cert. However, if you got married in Indonesia, you don’t need to translate your Indonesian Marriage Cert because it’s already in Indonesian language.
If you’re wondering how to get your documents translated to Bahasa, scroll to the top and read the section about “Look for sworn translators.”
2. Legalize documents at KBRI
Next, you need to legalize the following documents at KBRI:
- Passport (if issued in KBRI)
ICA final approval letter which is translated to IndonesiaROM Certificate which is translated to Indonesia
Reader’s feedback: KBRI SG can legalize passport issued by other countries’ KBRI as well.
For reference, here are the details about legalization service at KBRI: https://kemlu.go.id/singapore/en/pages/legalisasi_dokumen/670/about-service
To legalize documents at KBRI, here are the steps:
- Make appointment online at https://services.indonesianembassy.sg/. Click “Lihat Persyaratan” button, download formulir lembar bantuan Konsuler (in pdf). Fill it up and save in your computer in pdf/jpg/png format.
- Choose Date.
- Type your name, email and phone number.
- – For naskah asli, upload your passport.
– For formulir, upload the formulir you’ve filled up in the above step.
– State the number of documents you want to legalize
– Upload ALL the documents you want to legalize (including the passport you’ve already uploaded in naskah asli). - Wait for KBRI to reply you in email and confirm for your date of choosing
- On the day of your appointment, bring all the documents that you want to legalise and the formulir lembar bantuan konsuler. Go to Level 2 to submit your documents. After submission, you will be given QR codes to make payment via paynow. If you submitted 3 documents, you will have 3 QR codes. Now, make payment of S$35 to EACH of the QR code. Don’t pay everything using 1 code.
- Come back the next day to collect according to the time stated in the collection slip. KBRI will give you around 3-4 copies for each document. Only one of the copies has the real KBRI sticker, the others are just photocopies.
Submission is usually done in the morning, and collection is done in the afternoon the next day. So, be prepared to apply for half-day leave 2 times, once to submit, once to collect.
3. Scan these documents in JPG/JPEG/PNG format in color
After you get your legalized documents from KBRI and dukcapil, it’s time to get them scanned into JPG/JPEG/PNG format. The maximum size per file is 500kb. Here are the documents to be scanned in color (not black and white),:
- Original Passport & the legalized copy
- Original Birth Certificate & the legalized copy
- Original ROM Certificate, if any (both in English and Indonesian) & the legalized translated ROM cert (in Indonesian) – If you are not married, prepare a page that says not married, then scan it
- Original Indonesian Marriage Certificate, if any
& the legalized copy - ICA’s final approval letter (both in English and Indonesian)
& the legalized translated ICA letter (in Indonesian) - Photo of 4×6. Do crop the photo into the correct size (4cm by 6cm).
4. Register SAKE account
Now, go to AHU SAKE website and register for a new account. After you register, you have to wait for a while (like 10 to 30 mins) for the confirmation email from AHU.
When you receive the AHU confirmation email, click “Aktivasi Akun Anda” in the email. Only after doing that, you’ll be able to log in to SAKE system.

5. Choose the correct option
Once you log in, you’ll be able to enter the homepage (aka beranda), where you’ll see 8 options. Choose: PERMOHONAN SURAT KETERANGAN KEHILANGAN KEWARGANEGARAAN RI ATAS KEMAUAN SENDIRI BAGI ORANG YANG BELUM MEMPEROLEH KEWARGANEGARAAN ASING.
Do not choose the option that says “kepada Presiden” because this option will take you a longer time to complete.
If you’re applying for kids under 18 years old, choose the one that says PERMOHONAN SURAT KETERANGAN KEHILANGAN KEWARGANEGARAAN RI ATAS KEMAUAN SENDIRI BAGI ORANG YANG TELAH MEMPEROLEH KEWARGANEGARAAN ASING.

6. Fill up the form
Next, it’s time to fill up the form! Do note that you need to fill up the form in 1 day. It’s not possible to save it and continue later.
The first form that you need to fill is about yourself.
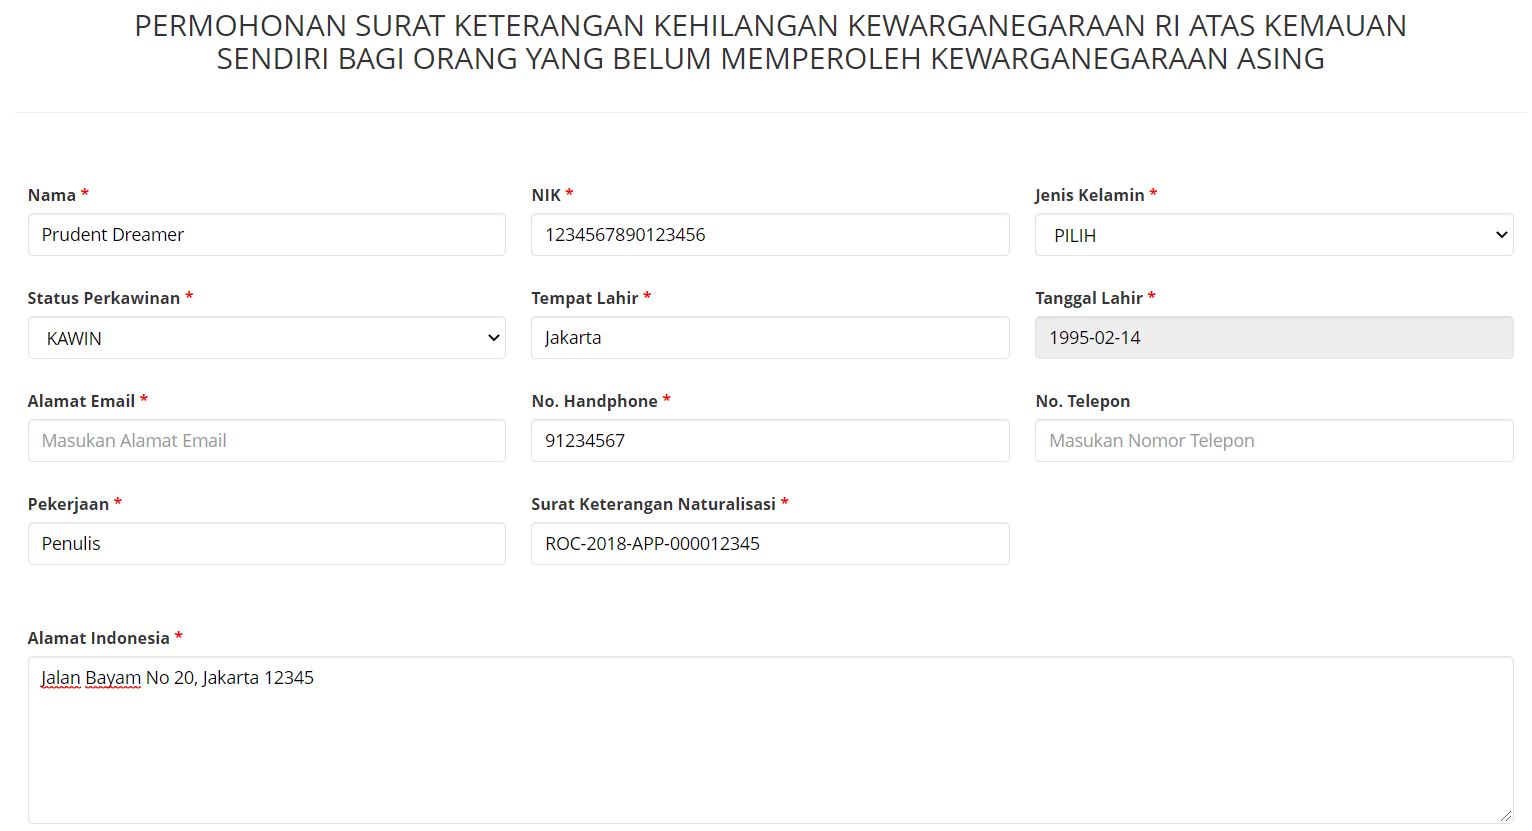
- Nama: Your full name
- NIK: Your NIK number which can be found in your KK or KTP
- Jenis Kelamin: Your gender
- Status Perkawinan: Your marital status
- Tempat Lahir: Your birthplace
- Tanggal Lahir: Your birthday
- Alamat Email: Your email
- No Handphone: Your handphone number without country code
- No Telp: Your house phone number, if any
- Pekerjaan: Your occupation
- Surat Keterangan Naturalisasi: Your application number that can be found in ICA’s approval letter
- Alamat Indonesia: Your address in Indonesia
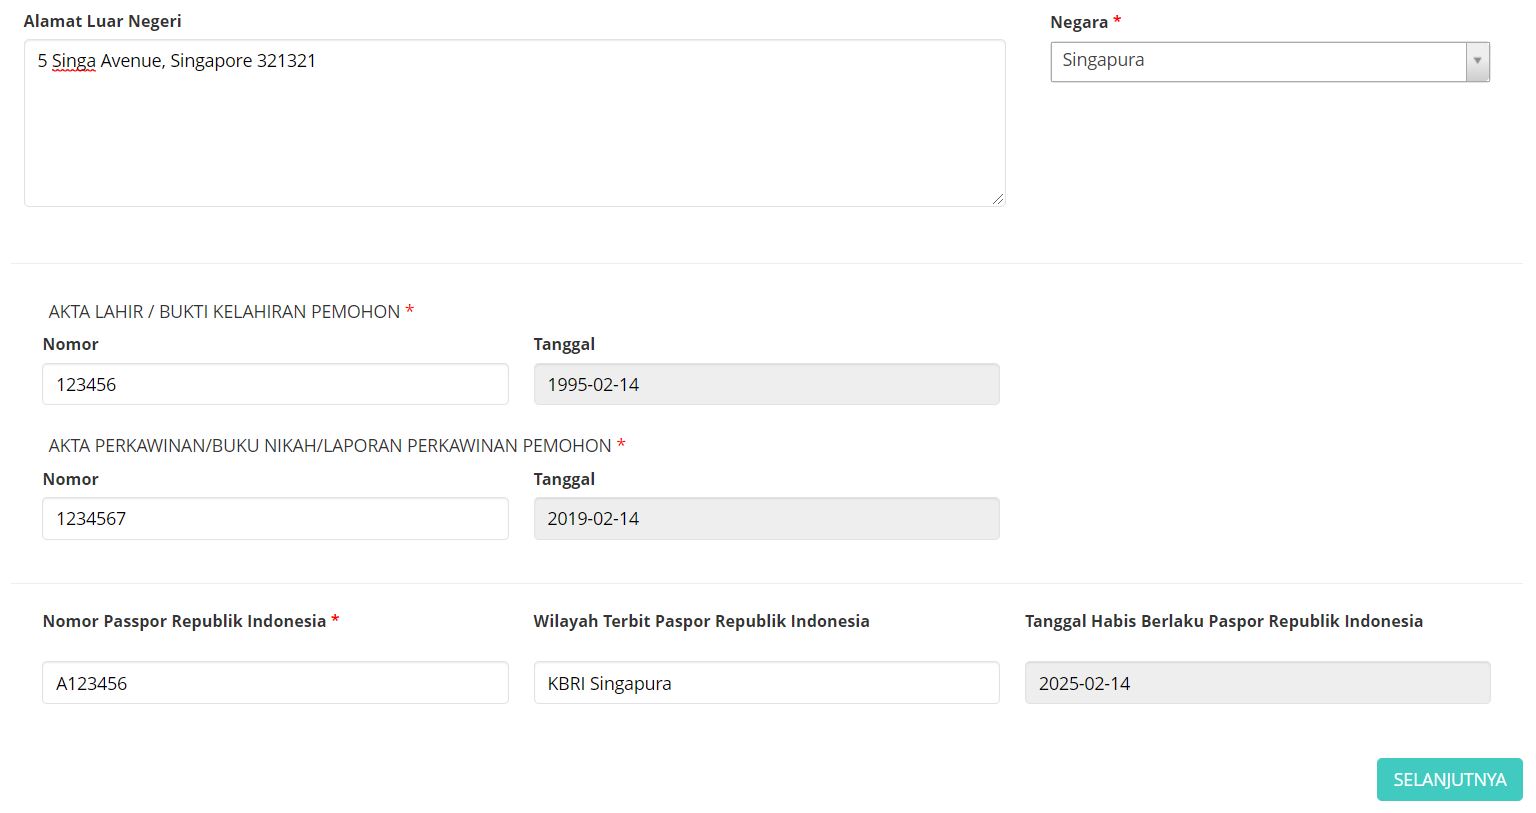
- Alamat Luar Negeri: Your overseas address
- Negara: Your country of residence
- Akta Lahir Nomor: Your birth cert reference number
- Akta Lahir Tanggal: Your birth cert date of issue (not your birthday)
- Akta Perkawinan Nomor: Your marriage cert reference number
- Akta Perkawinan Tanggal: Your marriage cert date of issue
- Nomor Passpor Republik Indonesia: Your Indonesian Passport’s number
- Wilayah Terbit Passpor Republik Indonesia: Your Indonesian Passport’s place of issue
- Tanggal Habis Berlaku Passpor Republik Indonesia: Your Indonesian Passport’s expiry date
Then, click “Selanjutnya.” You’ll be asked to confirm that you’ve filled up the correct information. Click “OK”
The second form that you need to fill up is about your parent or your guardian.
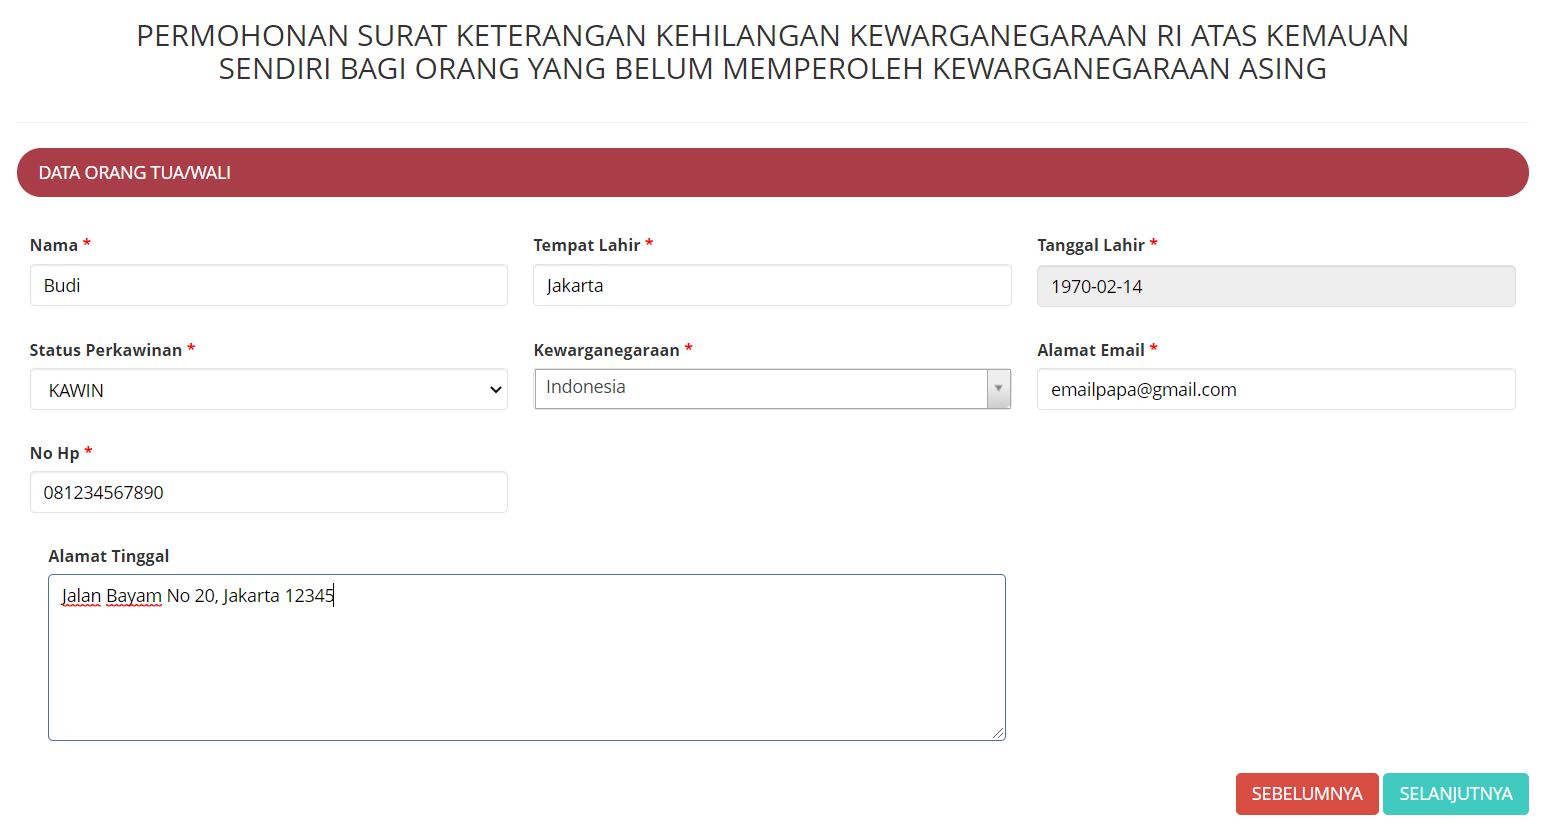
- Nama: Your parent/guardian’s name
- Tempat Lahir: Your parent/guardian’s birthplace
- Tanggal Lahir: Your parent/guardian’s birthday
- Status Perkawinan: Your parent/guardian’s marital status
- Kewarganegaraan: Your parent/guardian’s nationality
- Alamat Email: Your parent/guardian’s email
- No Hp: Your parent/guardian’s phone number
- Alamat Tinggal: Your parent/guardian’s address
Then, click “Selanjutnya.” You’ll be asked to confirm that you’ve filled up the correct information. Click “OK”
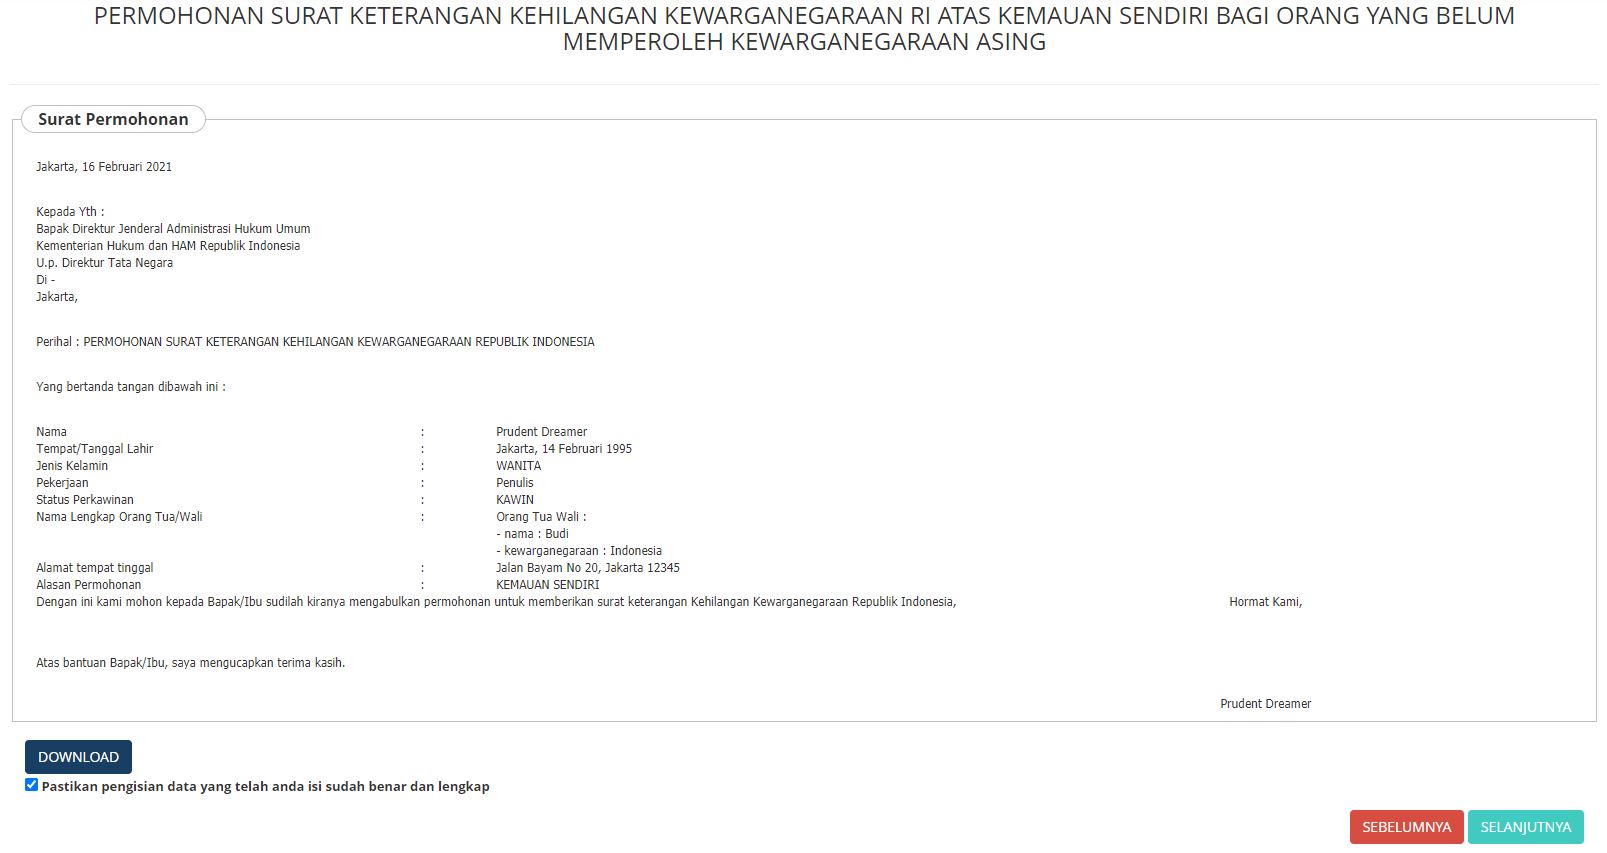
7. Download Surat Permohonan
Then, the Surat Permohonan will be generated for you. Click “Download” to save the file in your computer. This is a very important document.
Then, tick the box below the Download button, and click “Selanjutnya.”
8. Upload the documents
Next, you need to upload the documents that you have scanned previously in Step No 3 above. Remember, these documents must be in JPG, JPEG or PNG. Do not submit PDF documents.
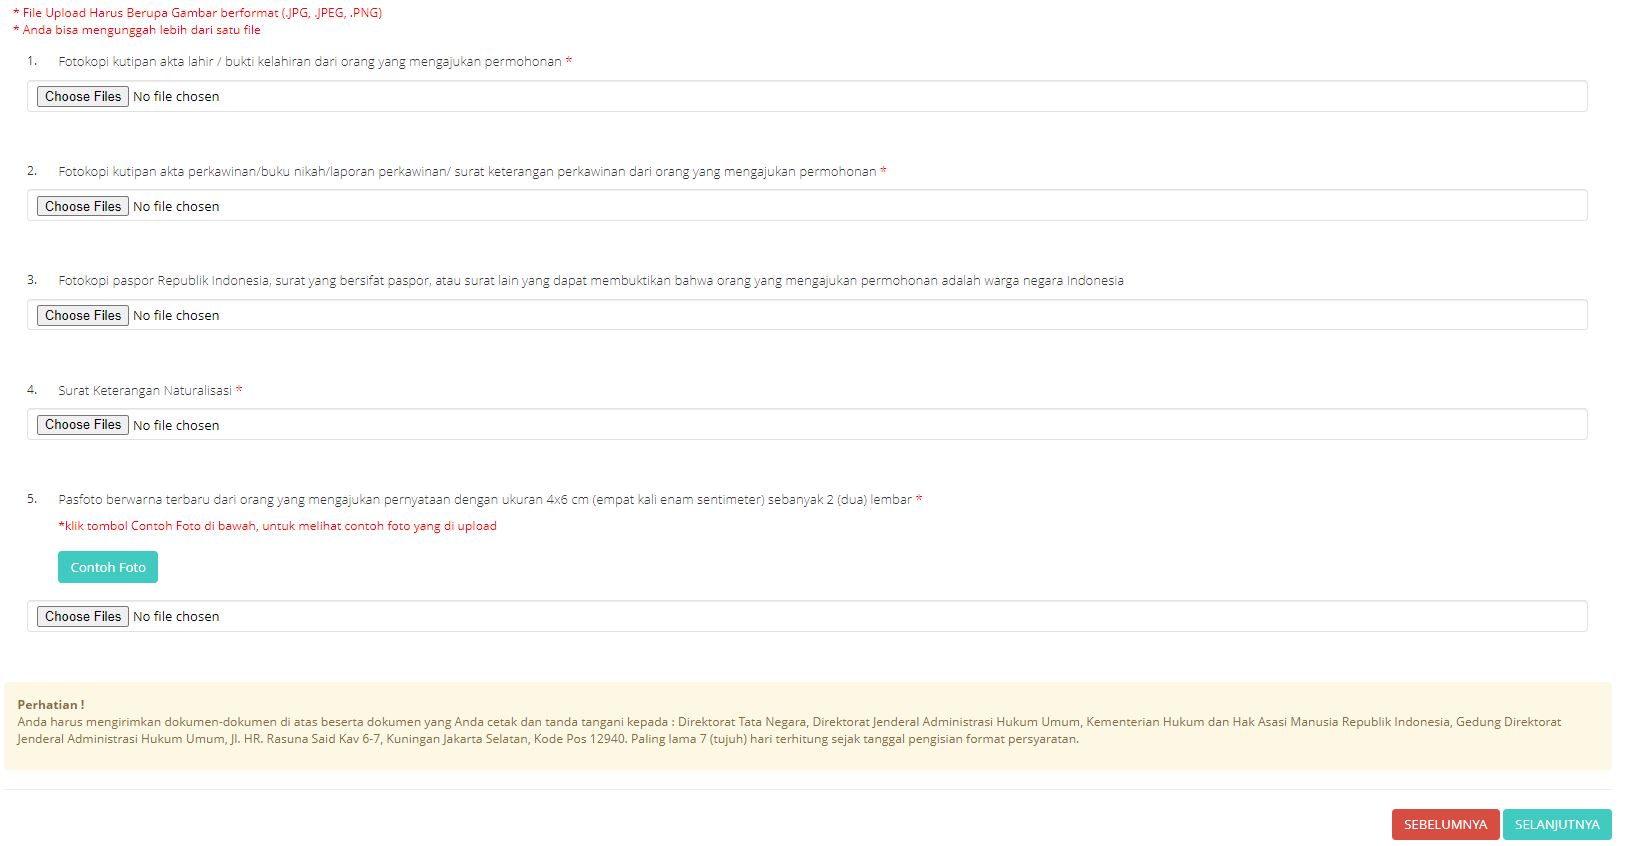
- Fotokopi kutipan akta lahir / bukti kelahiran dari orang yang mengajukan permohonan: upload the color scanned copy of your original birth cert and legalized copy
- Fotokopi kutipan akta perkawinan/buku nikah/laporan perkawinan/ surat keterangan perkawinan dari orang yang mengajukan permohonan: upload the color scanned copy of your original ROM Cert (both English & Indonesian),
and the legalized translated ROM. If you’re not married, just upload a blank document. - Fotokopi paspor Republik Indonesia, surat yang bersifat paspor, atau surat lain yang dapat membuktikan bahwa orang yang mengajukan permohonan adalah warga negara Indonesia: upload the color scanned copy of your original passport & KTP and the legalized copies.
- Nomor Paspor Asing/Sertifikat Warga Negara Asing: upload the color scanned copy of your original ICA’s final approval letter (in English and Indonesian), a
nd the legalized translated ICA’s final approval letter (in Indonesian). - Pasfoto berwarna terbaru dari orang yang mengajukan pernyataan dengan ukuran 4×6 cm (empat kali enam sentimeter) sebanyak 2 (dua) lembar: upload your photo of 4×6 with red background. Do crop the photo into the correct size (4cm by 6cm).
Then, click “Selanjutnya.”
9. Choose Payment Method
Now, you’ve arrived at a page called “Pembayaran PNBP.” You need to choose whether you want to pay in Indonesia or Overseas.
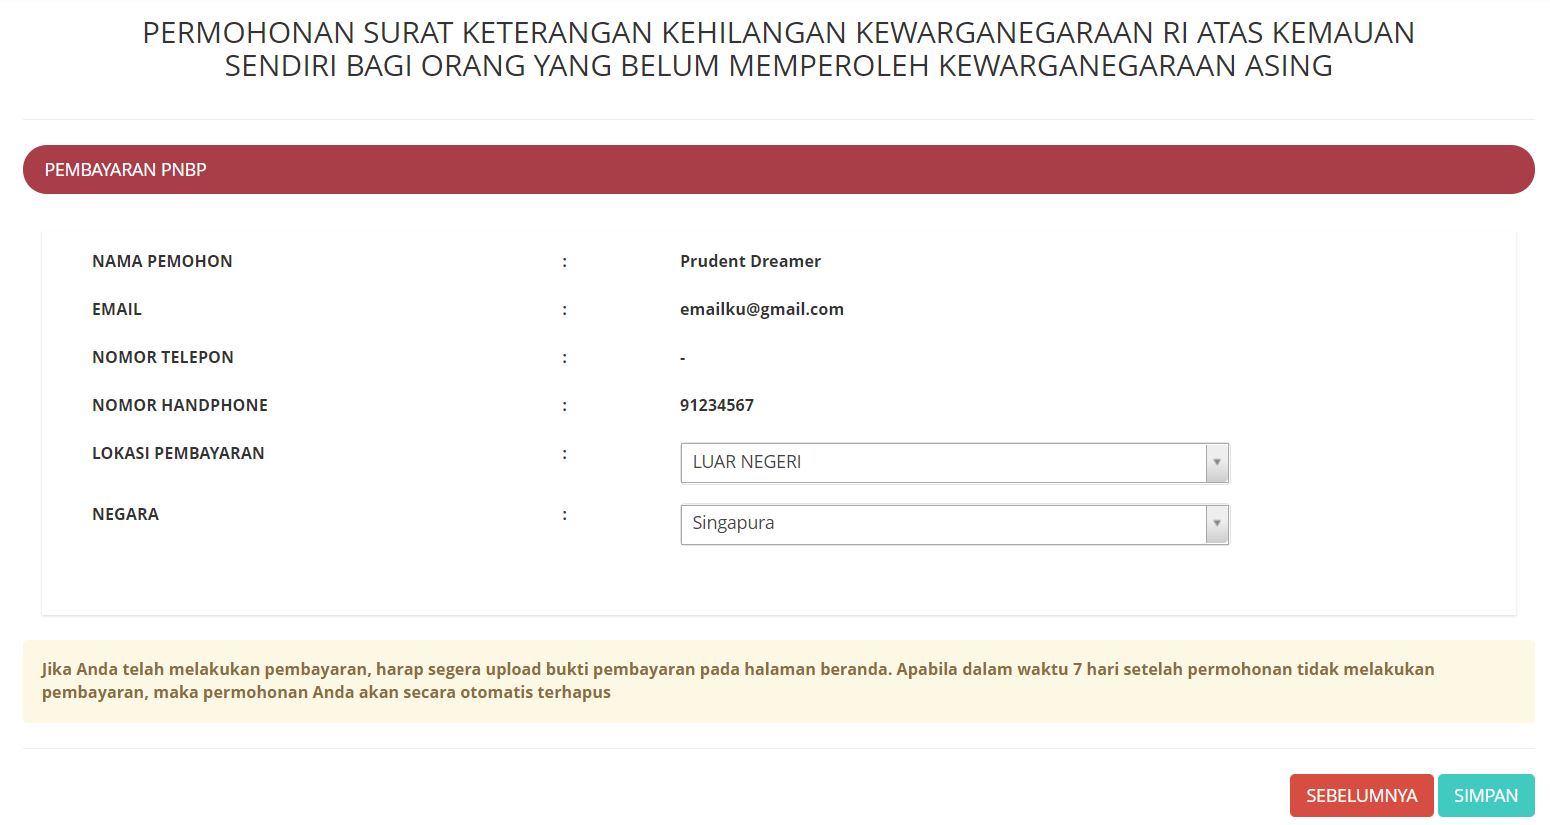
- Lokasi Pembayaran: Choose Dalam Negeri if you intend to pay in Indonesia, otherwise choose Luar Negeri.
- Wilayah/Negara: If you chose Dalam Negeri in the previous option, now you need to choose the province from where you’ll make payment. If you chose Luar Negeri in the previous option, now you need to choose the country from where you’ll make payment.
For me, in 2020, I chose Luar Negeri (Singapura). However, in 2023, I DO NOT recommend Luar Negeri anymore because there are some issues with their Luar Negeri payment system and your application will disappear if you pay with BNI Singapore or DBS Remit.
The recommended payment method as of 2023 is BNI Dalam Negeri. Other alternatives are other banks that offer “Penerimaan Negara” services, such as BCA, Mandiri.
To make payment in Indonesia, you need to ask your family member or friend to go to the bank to make the payment at the counter, or do it via online banking.
To make payment in Singapore, there are 2 ways: through BNI at Cecil Street, or through DBS Remit. For me, I chose BNI at Cecil Street. My next step will be based on payment via BNI SG, which is not recommended anymore, so you can skip to Step 11.
Then, click “Simpan”
10. Make Payment
I do not recommend Luar Negeri method in 2023. This section is based on Luar Negeri, I keep it here for illustration purpose.
You’ll now see the page titled “SURAT PERINTAH BAYAR (PERMOHONAN DI LUAR NEGERI)”
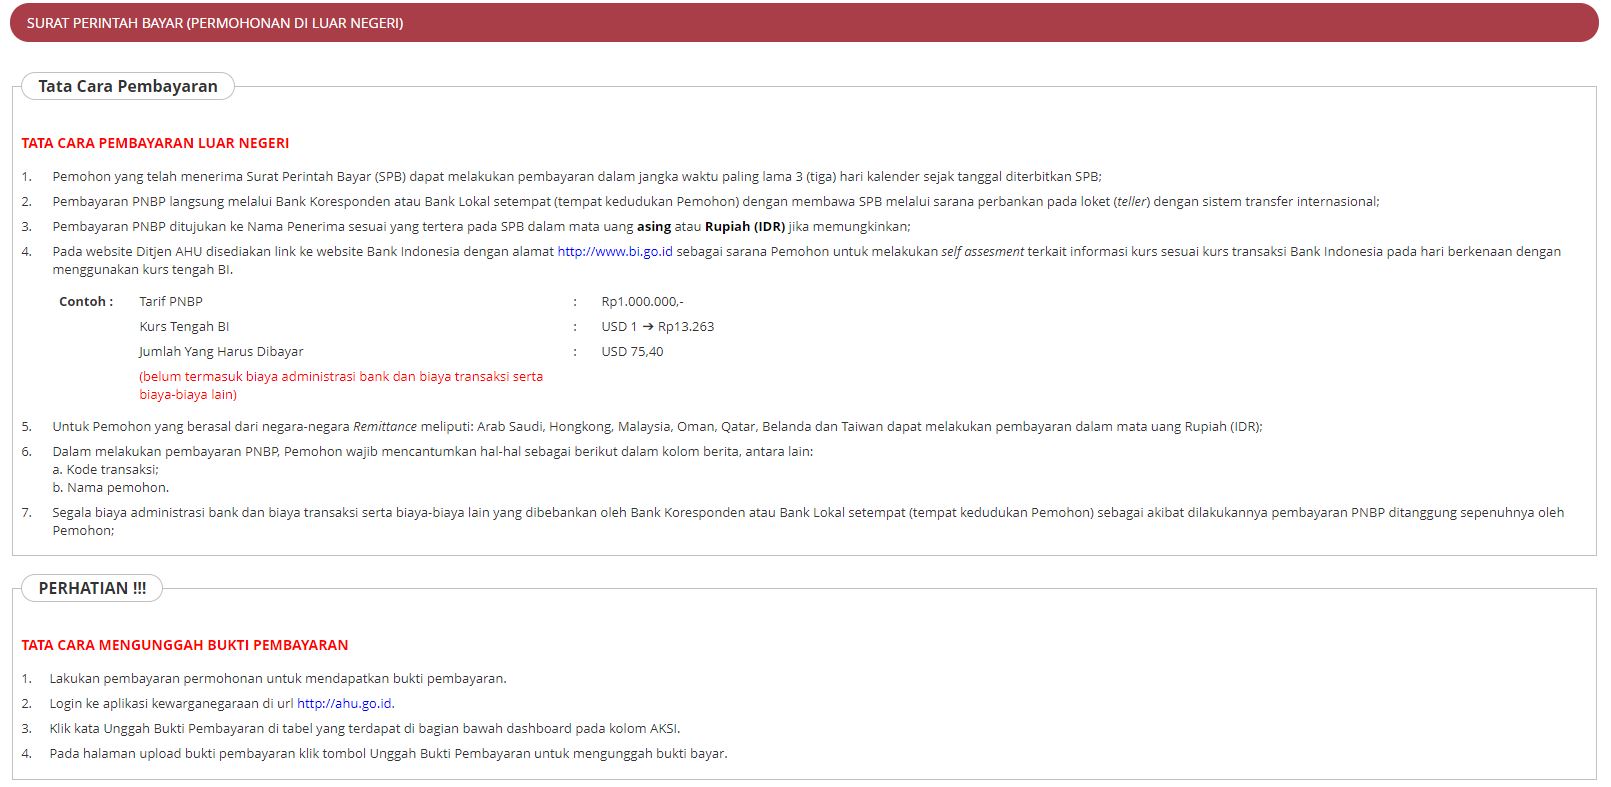
Here are the steps to make payment at BNI Cecil Street:
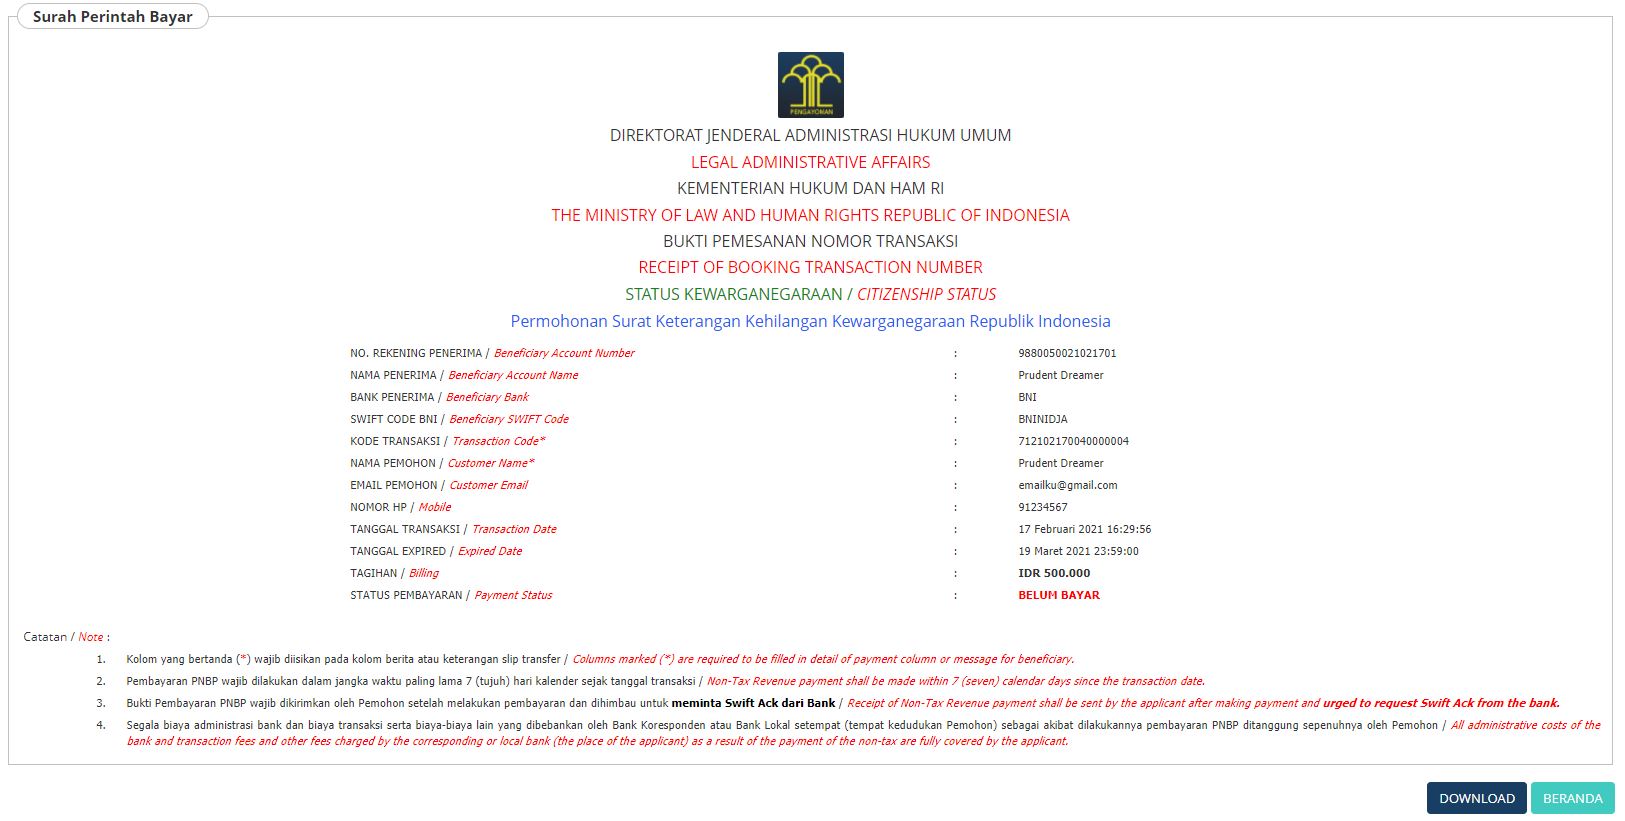
- Click the blue button to download Surat Perintah Bayar
- Print out Surat Perintah Bayar and bring it to BNI at Cecil Street
- Make payment at the counter. SAKE application costs IDR 500,000. They accept SGD and they’ll convert to Rupiah.
- Go back to BNI the next day to collect the payment receipt
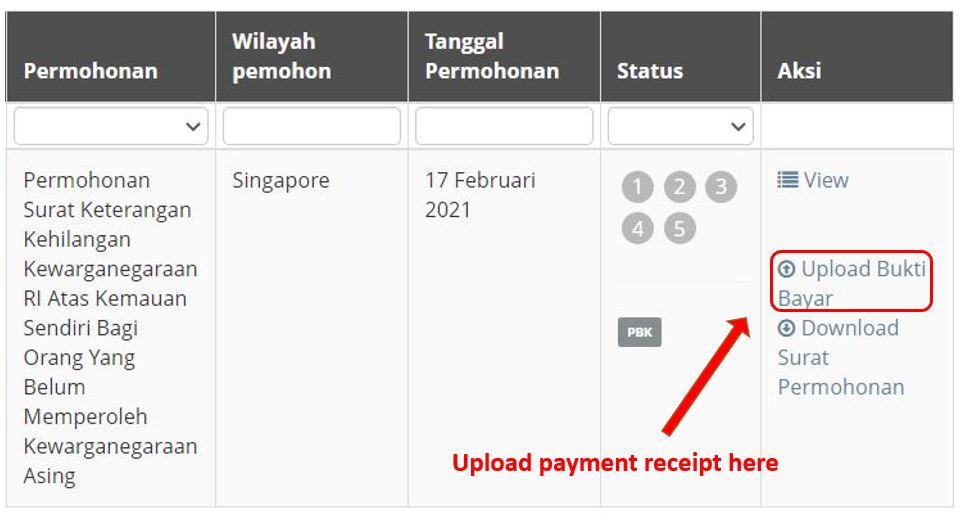
- Scan the payment receipt in color JPG/JPEG/PNG format and upload to SAKE system. The link to upload can be seen on beranda. After your upload, the link will disappear.
The following is how to make payment with DBS Remit, as shared by reader (Evelyn). BUT, I DON’T RECOMMEND paying with DBS Remit because many people have experienced their SAKE application missing from the system because they used DBS Remit. If you still want to use DBS Remit, proceed with your own risk.
- Login to your DBS online digibank
- Go to Transfer > DBS Remit and Overseas Transfer
- Key in the amount and click “Start New Transfer”
- In the recipient details:
- Recipient’s Full Name: Applicant Name (which is the ‘beneficiary account name’ in Surat Perintah Bayar)
- Recipient’s Address: put “-“
- Recipient Bank: follow Surat Perintah Bayar
- Account Number: follow Surat Perintah Bayar
- Purpose of Remittance: up to you
- Resident’s Account Type: non-resident
- After making the payment, take a screenshot of the confirmation page and upload it to SAKE. The link to upload can be seen on beranda. See photo above. After your upload, the link will disappear.
- Print the screenshot of DBS Remit confirmation page, you need it for Step 11 below.
Why does my application disappear? Several people have reported that their application disappeared. What you need to do is to email AHU and explain your situation and attach you payment receipt in the email. AHU will verify your payment and your application will be shown again.
11. Send the hardcopy documents to AHU Office in Jakarta
You’re almost there! Now, compile all of the documents listed below, put in an envelope (but don’t seal it yet because the courier will need to see the content of your envelope) and arrange for delivery with DHL/Fedex.
- Color Photocopy of your birth certificate & the legalized copy
- Color Photocopy of your passport & the legalized copy
- Color Photocopy of your ROM (English & Indonesian)
& the legalized copy of the translated ROM, if any. Or photocopy of your Indonesian marriage cert & the legalized copy. - Photocopy of ICA’s final approval letter, the translated copy
& the legalized copy of the translated letter. - 6pcs photo of size 4×6 with red background
- Color Photocopy of your KTP & the legalized copy
- Surat permohonan (which you have downloaded in Step 7). You need to paste a materai at the signature field, and sign half on the materai and half on the paper. If unsure, google “tanda tangan materai” to see some samples.
- Payment receipt from BNI or DBS Remit (which you received in Step 10)
PS: Some people may be confused whether to send the original legalized copy or the copy of the legalized copy. The answer is: you should send the original legalized copy. Here’s the logic: You own your original documents, so you can’t send your original documents to SAKE, but you need to prove to SAKE that you own the original document. To prove your ownership, you’re required to legalized the photocopy of your original document. So, the legalized document is the legal proof of your original documents. That’s why you need to send the original legalized copy.
PPS: Even though SAKE website requested the documents in F4-sized concorde paper or folio, I used A4 paper and there was no problem.
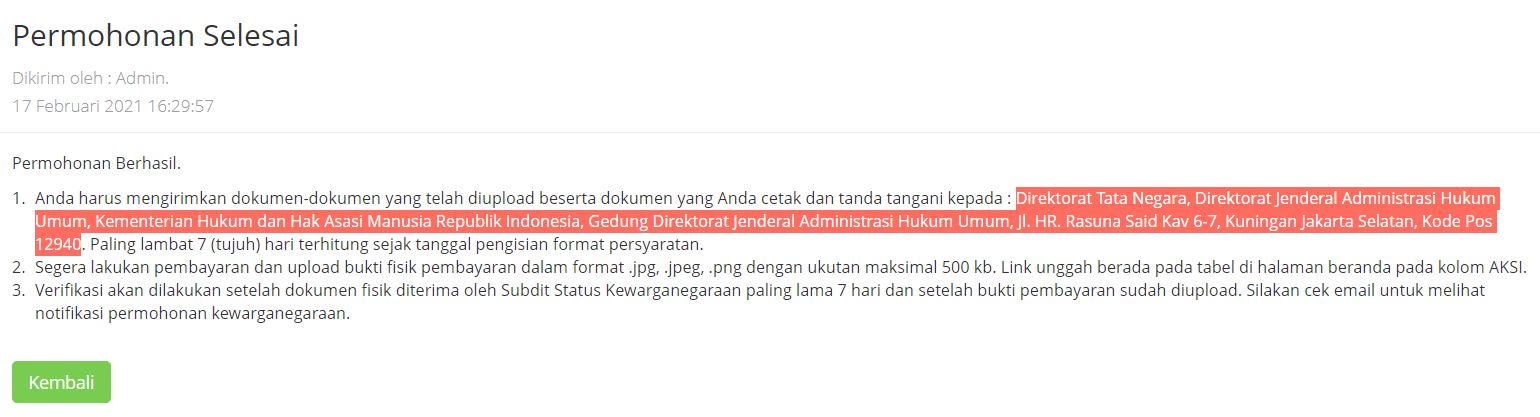
The address where you should send the document to is listed in your SAKE mailbox. The below image is what I can see in my mailbox.
By the way, I DO NOT recommend sending your document via Singpost because it takes too long to arrive at AHU. I’d rather pay more but have a peace of mind.
12. Keep praying and checking the SAKE system
It’ll take about 3-5 days for your document to arrive at AHU, you can track its journey through your courier’s website.
After the document arrives at AHU, it’ll take another 3-10 days for AHU to start processing your application. During this time, you can login to SAKE everyday (remember to clear your cache!) and check if any of the status turns green. Don’t get discourage if you don’t see any green status in the first 10 days, this thing takes time.
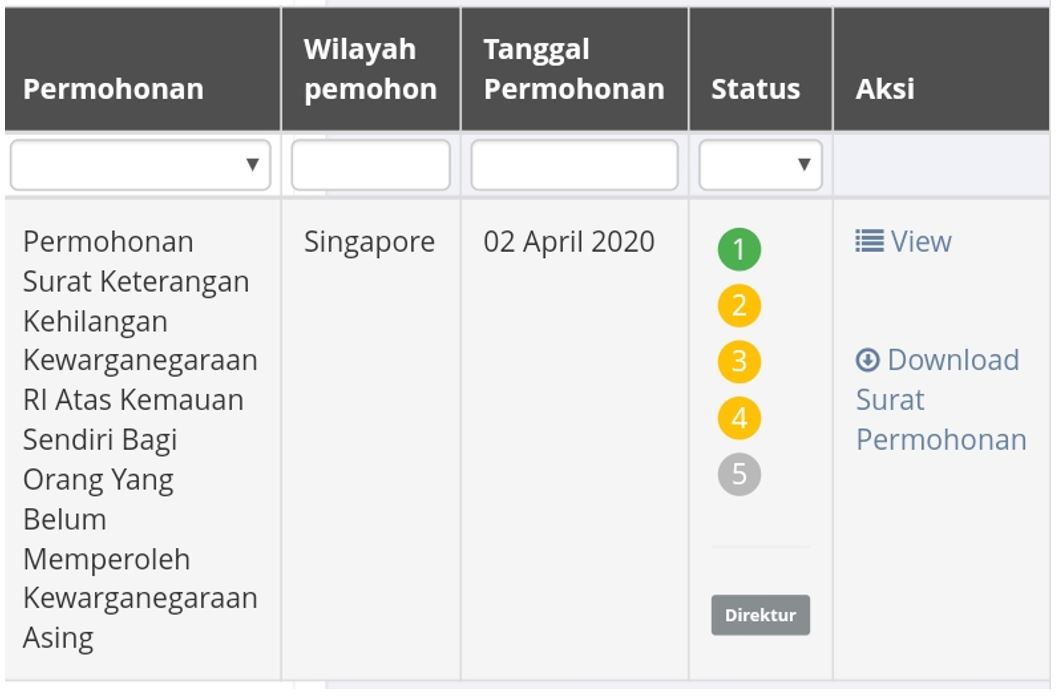
When you see the first green color in the status, it usually means that AHU has started to process your application. The most important status is the second status.
Between each status, there might be a gap of several days. During this stage, you must practice patience.
13. If there is error in your application
If your second status is yellow, it probably means you lack some documents. What you need to do is to wait until the fifth status turns yellow, then click “View” and scroll down to see the comments.
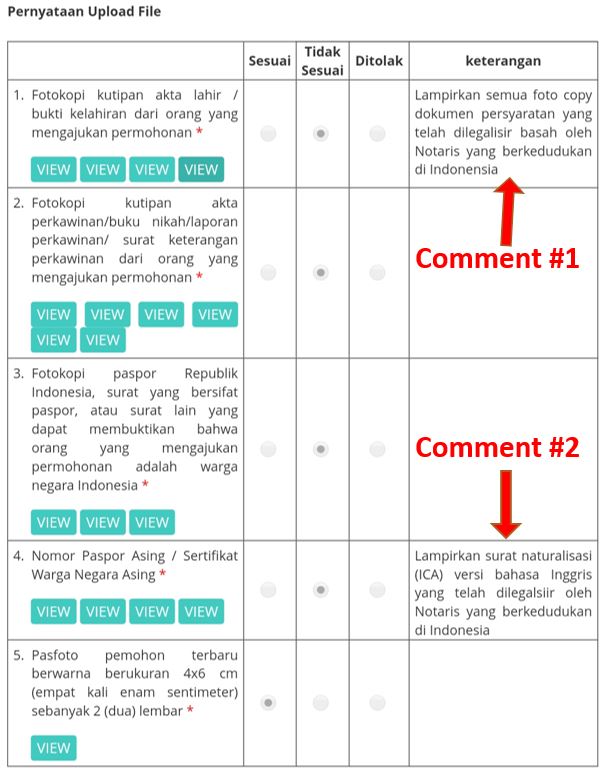
Below is example of the comments given by AHU. Sometimes, AHU’s comments are hard to understand. In the below example, there were 2 comments, but the first comment has been complied with, so it can be ignored. The real comment is in No 4, it says that ICA’s English letter has to be legalized.
If you don’t understand their comments, try to contact them through Whatsapp, call enter or email. Here’s AHU contact details.
After you figure out what’s missing here’s what you need to do:
- Go ahead and prepare that missing document
- Scan that missing document in JPG/JPEG/PNG
- Go to SAKE system, click “Ubah” and upload that missing document (PS: the button “Ubah” will only come out when number 5 turns yellow, so don’t be panic if you can’t find it yet)
- Send the hardcopy of that missing document to AHU office via DHL/Fedex
- Wait patiently (repeat step 12)
14. If you get all green, congratulations!
If the second status is green, usually it means your application is good. You’ll just have to wait until all status turn green in order to download the approval letter.
Again, practice patience because it’ll take weeks.
15. Download the approval document & translate it
Now that you have gotten 5 greens, download the approval document.
Send the approval letter to your sworn translator and get it translated to English. Again, I get Anwar to translate for me. He gave me 2 copies of translation, 1 with photo and 1 without photo.
16. Make appointment with KBRI to surrender your Indonesian passport
To make appointment with KBRI to surrender your Indonesian passport, you can email to im******@***************sy.sg. Do attach the SAKE approval letter in the email.
In this step, you’re dealing with Immigration section which is located at Level 1 of KBRI building.
17. Make appointment with KBRI Consular to legalize the approved AHU Letter
At the same time as Step 16, make appointment with KBRI Consular to legalize AHU approval letter via https://services.indonesianembassy.sg/ and choose Kekonsuleran. I’m not able to advise you the detailed steps because I did not use this online appointment service. During my time, I made appointment via email.
In this step, you’re dealing with Consular section which is located at Level 2 of KBRI building.
Do note that you’re dealing with 2 different department of KBRI Step 16 and Step 17, so you can’t combine both of them in a single email or a single appointment.
Update June 2021: Some people reported that it’s no longer necessary to legalize the approved AHU Letter.
18. Surrender your Indonesian passport
On your appointment date to surrender passport, make your way to KBRI early because there’ll always be queue at KBRI. Wear appropriately (covered shoes, formal wear, covered shoulder, etc).
Remember to bring the hardcopy of your appointment email from KBRI, your passport, and the print out of AHU approval letter.
During my time, no queue number was issued to me, so I had to approach counter 1 to explain about my situation. They then gave me a form to fill up. After that, they’ll ask you to come back the next day to collect the acknowledgment letter. You don’t need to translate this acknowledgment letter.
19. Legalize your AHU approval letter
On your appointment date to legalize AHU approval letter, make your way to KBRI early because there’ll always be queue at KBRI. Wear appropriately (covered shoes, formal wear, etc).
Remember to bring the hardcopy of your appointment email from KBRI, the color print-out of AHU approval letter, the translated version of AHU approval letter (KBRI will take the one without photo), exact amount of SGD 35 cash.
After you take the queue number from security, go up to Level 2 and wait for your name to be called. Submit your documents to Consular, then go down to Level 1 Cashier to make payment.
You’ll be given a date to come back to KBRI to collect the legalized letter.
Update June 2021: Some people reported that it’s no longer necessary to legalize the approved AHU Letter.
20. Go to ICA for Oath taking and submission of necessary documents
When you requested for extension in the earlier steps, ICA would’ve given you revised appointment date. On your appointment date with ICA, wear appropriately and bring the following documents.
- Original ICA’s final approval letter
- Original color printout of SAKE approval letter in Bahasa Indonesia and English
- Acknowledgment letter of your passport surrender from KBRI
- Your blue IC
- 3pcs passport-sized photographs taken not more than 3 months ago
When you arrive at ICA, go to Level 6 and scan your ICA’s final approval letter to get a queue number. When your number is called, submit the above documents and make the necessary payment. During my time, it was SGD 80.
After the completion of registration, wait again for your number to be called for Oath taking.
After the Oath taking, you can go back home and submit your passport application online.
Congratulations, you’re officially a citizen of Singapore! But your pink IC will only be given to you during Citizenship Ceremony a few weeks later, so you’ll still need to practice patience. By this time, I’m pretty sure your patience is perfectly honed and you can withstand any challenges in your life calmly. Again, congratulations!
FAQ
What if I don’t have Indonesian passport? Sorry, I have no answer to this, I guess you need to make a new one. But that’s just my guess.
What if I don’t have KTP? Firstly, do you have KK? If yes, you can use KK to retrieve your NIK number, and then legalize the KK and submit together with other documents to AHU.
If you don’t have KK, sorry, I myself have no experience in this. However, I would highly suggest that you make a new KK or join the KK of your family/relatives in Indonesia, this will smoothen your renunciation journey a lot. Alternatively, I heard that you can consider applying for NIT as a temporary KTP, and use the NIT number to fill the form where it requested for NIK, but I’m not sure how long it takes and whether this could solve your problem.
What if my KTP is expired? Some people used their expired KTP and it was accepted by AHU.
Do the documents need to be legalized by MFA and SLA? Nope, AHU doesn’t require any legalisation from MFA or SLA, they just need legalisation from Indonesian representative and issuing institutions. Keep your money and don’t waste time making a trip to MFA/SLA like I did.
Can I go to KBRI without appointment? Nope, appointment is a must.
Do I HAVE TO follow your guide? Can I do it other way because of bla-bla-bla? You don’t have to. This is not the official guide, I am just sharing my own experience and reader’s experience. My experience is based on what my friend taught me to do. Sure, you can do it your way, but I can’t tell you whether your way is correct or not because I really don’t know; only official SAKE people have the answer and I’m not SAKE people.
Help! I can’t upload my docs, how? Or, my uploaded docs went missing, how? Or, I can’t log in, how? Based on my friends’ and my experience, SAKE website does have glitches from time to time, just be patient, give them time to sort their issues. Most of the time, things went back to normal after a few days.
Please Note
This article is written based on my own experience and what I heard/read from other people. AHU and KBRI change system and procedures ALL. THE. TIME. So, it is possible that some part of my article is no longer valid. Please don’t take my advice as a professional advice. I’m just a blogger that you chance upon on the internet.
I’m not responsible for any changes in procedures and not responsible for any loss/damage you suffer in the course of your application.
I am not related to anyone in AHU, KBRI or ICA. I am not able to act on your behalf.
If you have recently completed the application and you notice some of the things in this article are no longer valid, feel free to let me know in the comment and I’ll do my best to include the new information.
If you have any question related to the procedure, you may ask me in the comment and I’ll do my best to answer if it’s not already stated in the article. I have a full-time job and this blog is just my hobby, so it may take days for me to respond to your comment. Hope for your understanding. And please don’t ask for my handphone number because I’m very shy 🙂
Good luck to your application!
FYI: There is a Google sheet contributed by members of the Telegram group who have successfully passed the renunciation procedure based on the latest changes in April 2022. You can view it here for your reference. Thanks a lot to David who created the group and the spreadsheet, as well as all the members who contributed their experience in the group and made this incredibly useful spreadsheet possible. If you want to have discussion with people who are going through the renunciation, you can join the telegram group.
If you find this post helpful, feel free to buy me a coffee :)
After five months, I’m finally going to the ICA for Oath-Taking. Truth to be told, I will not be able to do it without this guidance. You are a saviour.
If you sent two set of Photos ( white and red background ), how to deselect or delete one set?
Is there any edit function to upload correct documents?
Ada yg tahu no rekening bni?
Buat pembayaran?
Ada yang bisa bantu?
Atau no rekening pembayaran pakai dbs?
If I were born in Singapore, do I need to do authorisation and legalisation my birth certificate issued by Singapore government at Singapore Academy of Law?
Hi.
Apakah sudah berhasil?
How can I join the telegram group? its notified as private and not allowing me to join…
Do you suggest to remove your name from your family house tittle deed and removed all the bank account, insurance etc from Indo before renouncing your indonesian citizenship? Thanks
Hi, Thanks for your guide. I can submit mine on SAKE. At first, I encountered a problem going to the next step due to the Indonesia home address error stating different from Dukcapil office. Until I follow the written Indonesia home address in your guide and can complete the application. I wish they had a much easier and more systematic home address format in the application. Instead SAKE just stated the home address problem which is different from Dukcapil when my Indonesia home address is correct. I wasted 3 weeks trying to figure out the problem. I have one question. Do we still need to legalise copy of the Indonesia Birth Cert (Akta Kelahiran) and KK even if the certs are in the Indonesian language? Can we get KBRI to legalise the AK and KK copy when we go to KBRI to legalise our passport copy? Thanks.
Thank You for sharing. Now I’m waiting for no 5 to be green.
Thank you for sharing
Hallo,
Mau nanya nih, kalau KTP lama udah expire and dukcipal ngak bisa legalisir, apakah masih bisa submit fotocopy KTP tanpa legalisir ke AHU?
Bagaimana kalau nggak ada KTP sama KK.thanks
Do you have an answer for this ?
Hi, saya lagi proses SAKE. Tp blon final Ke surat keputusan apakah masih bisa pakai paspor Indonesia. Thanks in advance
Hi where can l legalized my documents in Singapore
Does the ICA final letter need to be legalized? Or translated by sworn translation is sufficient.
Sworn translation is enough. I just got my certificate of renunciation.
Hi Ari, may I ask you some question?
1. Once you have filled up the online application, will you be able to go overseas?
2. How long does it take for the process from the day of your online submission till you get your approval of renunciation?
Hello! Thank you so much for your blogpost, it’s been very helpful. Is it absolutely necessary to legalise akta kelahiran and KTP? Is it possible to do so in Singapore or do I need to fly back to Indonesia to do so? The dukcapil website is very confusing.
sebaiknya langsung aja mbak ke dukcapil biar langsung di legalisir akte dan ktp nya.teman saya juga lagi dalam proses ini
Hi may I know Singapore where can I legaliza the document
Hello. I am a little confused. Do we need to legalize the documents? :
1. ICA Final Letter
2. Singapore Passport
3. Certificate of Citizenship
Also, can we need to engage a lawyer to process the AHU or do we have to do it by ourselves?
Hello, do I need to legalised my original ROM cert? Thank you.